Embarking on the adventure of adding a new tile backsplash installation to your kitchen or bathroom is an exciting journey, filled with a mix of joy and a little bit of nervousness, especially if it’s your first time. But there’s no need to worry! This friendly guide is here just for you, whether you’re starting from scratch or aiming to get even better at this creative task. We’ll take you by the hand and guide you step by step, making sure you have all the know-how to transform your space. Imagine turning that sparkle of an idea into a beautiful reality, with each tile bringing you closer to the kitchen or bathroom of your dreams. Let’s dive in together, making your vision come to life, one tile after another, in a way that’s as fun as it is rewarding.
Introduction
Imagine standing in your kitchen, taking in the beautiful backdrop that makes your space look like it came out of a home design magazine. And the best part? You created that stunning backsplash yourself. This dream scene is achievable. Putting in a new tile backsplash installation is an excellent way to give your kitchen or bathroom a fresh look. Plus, you don’t need to be an expert to do it. With some simple instructions, anyone can transform their room. It’s not just about making your space more stylish; it’s about adding your personal touch and enjoying the satisfaction of DIY. Adding a tile backsplash installation is like giving your kitchen a mini-makeover that reflects your taste and style. So, why not take the plunge? With a bit of effort, your kitchen can be that magazine-cover space you’ve always wanted.
Understanding the Importance of a Tile Backsplash
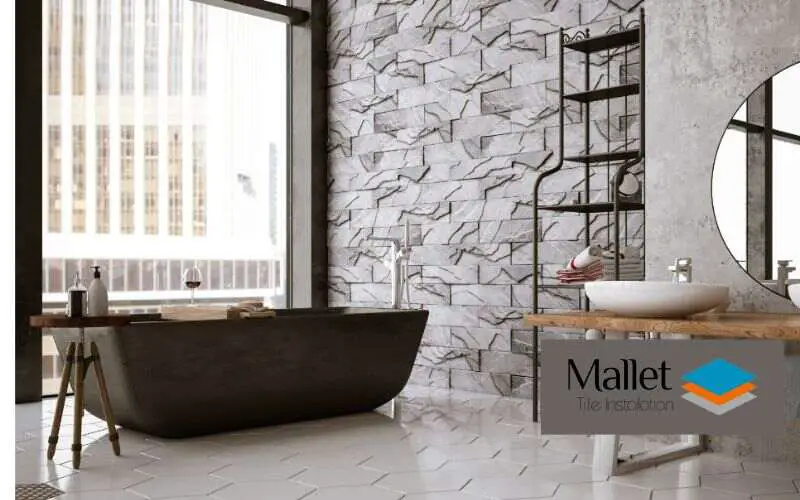
A tile backsplash isn’t just a guard for your walls against messes and spills; it’s so much more than that. Picture this: it’s like the special touch that brings the whole look of your room together, making it feel complete. Plus, believe it or not, it can help boost your home’s value too. It’s not just any backdrop; it’s the scenery for when you’re whipping up meals or starting your day. It adds a unique touch to your kitchen or bathroom, making these spaces truly your own. So, when you think about it, having a tile backsplash is really about adding a bit of your personality into your home.

Overview of Tools and Materials Needed
Before diving in, you’ll need the right tools and materials:
- Tiles
- Adhesive
- Grout
- Tile cutter
- Notched trowel
- Grout float
- Spacers
- Level
- Sponge & bucket
Gathering your equipment beforehand ensures a smoother process from start to finish.
Setting the Right Expectations: Time, Effort, and Skill Level
When tackling a do-it-yourself project, especially one that involves creating something by hand, it’s super important to be honest with yourself about how much time and effort it’s going to take. If your project is a bit complicated or you’re not super used to doing things yourself, you might need to clear your schedule for a weekend or even two. You want to make sure you do it right, and rushing through it won’t get you the awesome results you’re looking for. Remember, being patient is key here. Taking your time to pay attention to those little details is what can turn a good project into a great one. So, before you dive in headfirst, take a moment, plan it out, and get ready to be patient. This way, you’ll end up super proud of what you’ve made, and all that effort will be worth it.
Planning Your Tile Backsplash Project
Before diving into a tiling project, remember that being well-prepared is like winning half the fight. Start by accurately measuring your space; this ensures you know exactly how much material you need, avoiding the frustration of running short mid-project. Then, have a clear design in mind. Planning your layout and style makes the process smoother and the outcome more satisfying. And here’s a pro tip: always buy a few extra tiles. Mishaps happen—maybe you cut a tile wrong or one break. Plus, if a tile gets damaged down the line, having matching replacements ready can save your day. By following these simple steps, you’re setting yourself up for success and making the road to a beautiful tiled space much easier.
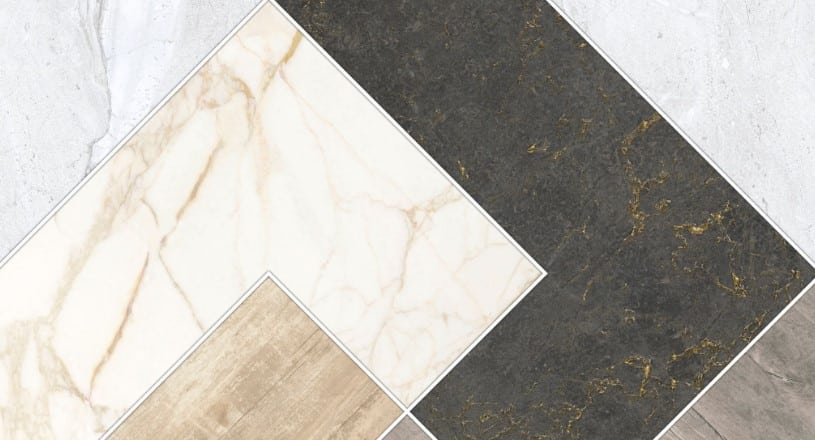
Choosing the Right Tiles for Your Space
Choosing the right tile for your room can be an exciting adventure! Imagine walking into a store or browsing online, and you’re greeted by a sea of tiles in all colors, shapes, and materials. Whether it’s ceramic, porcelain, or glass, each type has its charm. Think about the feeling you want your room to have. If you’re someone who loves a sleek and modern look, you might lean towards shiny porcelain. On the other hand, if you prefer a cozy, warm vibe, rustic ceramic tiles could be your best pick. The key is to match the tiles with the room’s overall feel, making sure it’s a place you’ll love to spend time in. Remember, picking tiles isn’t just about the material; it’s about bringing your style into your space and making it truly yours.
Considerations for Color, Texture, and Material
When it comes to designing a room, the colors and textures you pick are super important. Imagine you have a tiny room and you want it to look bigger. Using light colors on the walls can trick your eyes into thinking the space is larger than it is. It’s like when you wear a white shirt on a hot day to feel cooler; light colors in a room can make it feel more open and airy. Now, if you want to add some serious style and make a room feel cozy or dramatic, dark colors are the way to go. They’re like the night sky, deep and full of mystery, making the room feel closer and more intimate. But, colors aren’t the only stars of the show; texture also plays a huge part. Think about the softness of a fluffy rug under your feet or the rough touch of a brick wall. These textures make the space more interesting and give it a unique personality. They can make your room not just look good but feel good too, inviting you in to touch and experience the space. So, picking the right colors and textures isn’t just about making a room pretty; it’s about creating a vibe that makes the room yours.
Size Matters: How to Decide on Tile Dimensions
When you’re deciding how to decorate a room, the size of the tiles you choose can make a big difference in how it looks and feels. Bigger tiles tend to make a space seem larger and less cluttered because fewer grout lines break up the view. This can make a room feel more open and airy. On the other hand, smaller tiles can add a lot of character and detail to a space. They’re great for creating patterns or adding texture, which can make a room more interesting and lively. So, when you’re picking out tiles, think about the mood you want to set. Do you want your space to be calm and spacious, or are you aiming for something more dynamic and full of detail? Your choice of tile size can help you achieve that effect, making your room look just the way you want it.
Quantity Calculations: How Much to Buy
When you’re planning to put new tiles in your room, kitchen, or bathroom, it’s super important to remember this simple tip: always buy a bit more than you think you need, like 10-15% extra. Why, you ask? Well, it’s pretty easy to miss a few things when you’re measuring your space or cutting those tiles to fit perfectly. Plus, sometimes tiles break by accident because they are quite fragile. If you have extra tiles, you won’t have to worry if something goes wrong or if you make a small mistake in your measurements. It’s like having a safety net so you won’t be stuck or have to run back to the store at the last minute, which can be a real headache, especially if they run out of the tiles you’re using. So, buying a little more from the get-go means fewer worries and a smoother project. Think of it as your little insurance policy for a perfectly tiled space.
Designing Your Backsplash: Patterns and Layouts
When you think about adding a backsplash to your kitchen, it’s like painting a picture in your head. It’s that special touch that can make your kitchen look like it came out of a magazine or reflect your unique style. You’ve got two paths to choose from. Are you leaning towards a classic vibe, where everything looks timeless and elegant?
This could mean going for simple, yet beautiful tiles that never go out of style. Or, do you want your kitchen to tell its own story, showing off what makes you, well, you? This might mean picking tiles with bright colors, and interesting patterns, or even making a mosaic that no one else has. It’s all about what you feel would make your kitchen feel like it’s truly yours. So, what’s it going to be? Classic elegance or a dash of personal flair?
The Classic Subway Tile Layout
Subway tile layouts are like that friendly neighbor who fits in everywhere, making them a top pick for sprucing up your space. Why? They’re super easy to put up – no headaches involved. Plus, they have this classic look that never goes out of style. Imagine walking into a kitchen or bathroom and seeing those clean, neatly lined tiles – it just feels right. They’re like the jeans of the tiling world: simple, but they go well with everything. Whether your room is big or small, or your style is super modern or a bit more traditional, subway tiles have your back. They’re the reliable choice that keeps your place looking fresh and welcoming without trying too hard. So, if you’re scratching your head about what tiles to choose, subway tiles are your safe bet to make your space look great.
Herringbone, Chevron, and Other Trendy Patterns
If you’re looking to spice up your space with something bold and exciting, there are some amazing design patterns out there that can make a room pop. Think of adding stripes, polka dots, or even a splash of wild floral designs to your living area or bedroom. Yes, it takes a little extra work to get these patterns right, avoiding a clash of colors or an overwhelming look. But when you do, the result is something that makes you go ‘wow’ every time you step into the room. These patterns aren’t just random bursts of color; they’re a way to inject your personality and sense of adventure into your space. So, if you’re ready to roll up your sleeves and give your room a dazzling makeover, remember, that the effort is all part of the fun, and the outcome is worth it. Your space will not just be another room; it will be a statement of dynamism and flair that truly represents you.
Custom Designs: Creating a Unique Look
Transforming a kitchen or bathroom with a unique backsplash is like adding a splash of personality to a blank canvas. Imagine mixing different colors that pop, playing with finishes that catch the eye, and choosing sizes that fit just right. It’s not just about covering a space; it’s about creating a statement that’s all yours. Why stop there? Adding decorative tiles can turn a simple backsplash into a masterpiece. Picture a mosaic that tells a story, or vibrant colors that brighten your day. The possibilities are endless! It’s like painting your favorite picture but with tiles. So, let your imagination run wild and craft a backsplash that’s as unique as you are. Remember, when it comes to designing your space, the sky’s the limit!
Preparing Your Workspace
When starting any installation project at home, like putting up new shelves or wallpaper, first making sure your workspace is tidy and prepared can make everything go smoother. Imagine you’re about to create a masterpiece, but instead of a canvas, your kitchen or living room is your workspace. Before diving into the work, cover your countertops and appliances with sheets or newspapers to protect them from dust, paint, or glue. Just like when you’re getting ready to paint a picture, you want a clean and smooth surface, your wall should be clean, dry, and without any bumps or rough spots. This is like giving yourself a clean slate to work on, ensuring that whatever you’re installing will stick properly and look great. By doing these simple steps first, your installation process will be much easier, and you’ll likely be happier with the result. It’s all about taking the time to set up right, so when it’s go-time, everything goes without a hitch.
Layout Lines: The Blueprint for Your Backsplash
Before you dive into sticking those pretty tiles on the wall, grabbing a pencil and a ruler is crucial. This simple step of drawing your layout lines on the wall might seem like a small thing, but trust me, it’s a game-changer. It’s kind of like having a map when you’re on a road trip; it guides you, so you don’t end up with crooked tiles that make your room look wonky. Making sure your design is symmetrical and your tiles are level is super important, unless you’re going for the funhouse mirror look in your home. By taking the time to mark where each tile will go, you’re saving yourself a bunch of headaches down the road. No squinting from across the room trying to figure out if that tile is really straight or just pretending to be. Plus, who doesn’t love a wall that looks like it was done by a pro? So, grab that pencil and don’t skip this step. It’s your secret weapon for a wall that’s going to look awesome.
The Installation Process: Step-by-Step
When you’re getting ready to lay down some new tiles, think of it like starting a cool art project. First thing, you have to begin right in the middle of you want your tiles to go. This is your starting point. From here, you’ll spread out some glue (that’s your adhesive) to make sure the tiles stick to the floor or wall. Place each tile carefully, making sure they fit nicely next to each other. After all the tiles are down and the glue has dried, it’s time for the fun part – grouting. This is like the icing on the cake. Grouting fills in all the little spaces between your tiles, making everything look smooth and finished. So, from working with glue in the center to spreading out the grout at the end, you’re making your space look awesome, one step at a time.
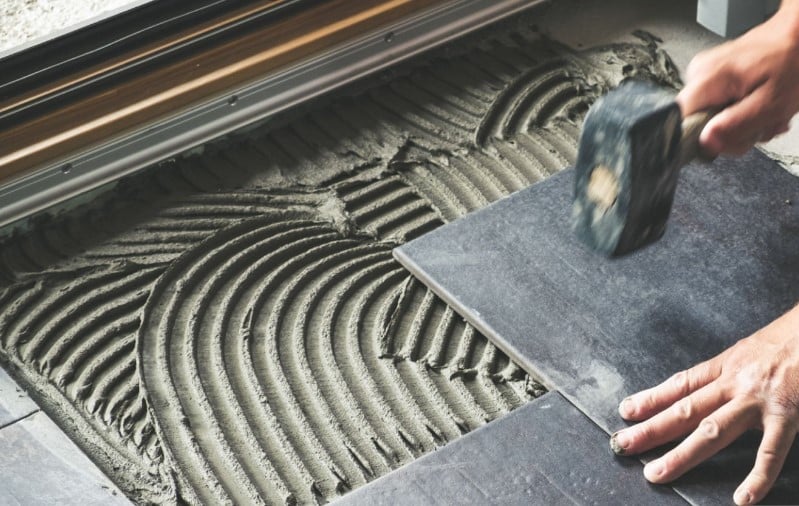
Applying the Adhesive
When you decide to lay down some tiles, whether it’s for your kitchen floor or bathroom wall, picking the right glue to stick them down is key. Just like choosing the best frosting for a cake, you need the right adhesive that matches your type of tile. There are a bunch out there, but don’t worry, it’s not as tricky as it sounds. Once you’ve got your perfect match, you’ll need a tool called a notched trowel. It’s pretty cool because it has these little teeth that help you spread the glue all over in an even layer. Think of it like spreading peanut butter on a slice of bread – you want it nice and even, without big lumps or empty spots. This smooth layer helps your tiles stick down properly and stay there, making your project look like a pro did it. So, remember, the right glue and a notched trowel are your best friends in the world of tiles.
Setting the Tiles
When you’re setting up tiles, whether on a wall or floor, it’s smart to start from the bottom and work your way up. Think of it like building a skyscraper. You wouldn’t start from the middle! Placing spacers between each tile is like giving them little elbow room so they don’t crowd each other. This space is important because it’s where your grout will go, filling in the gaps and making everything look neat. Now, here’s a little secret: keep a level handy and check your tiles often. That first row at the bottom?
It’s incredibly important. If you get that straight, it’s like rolling out a red carpet for the rest of your tiles to follow. Just like in a game of dominoes, if one is out of line, it can throw everything off. So, take your time, make sure everything’s straight and evenly spaced, and you’ll find yourself admiring a beautifully tiled surface when you’re done.
Making Cuts: Tools and Techniques for a Perfect Fit
When tackling a DIY project like laying tiles, you’ll quickly find out how tricky it can be to cut tiles perfectly, especially around outlets or when you’re finishing up a row. Here’s where a tile cutter becomes your best friend. The secret to making those difficult cuts?
Measure not just once, but twice, to make sure you’ve got your dimensions spot on. Then, with your measurements double-checked, it’s time to cut. But here’s another tip: take your time. Rushing can lead to mistakes, and with something like tile work, patience truly pays off. By measuring carefully and cutting with care, your tiles will fit beautifully around any obstacle and look professional, even if it’s your first time.
Grouting Your Backsplash
Once your tiles have firmly stuck to the wall or floor and the glue-like stuff underneath them has had enough time to dry, it’s time for the next step: filling in the spaces between them with grout. Grout is kind of like icing for tiles; it keeps them all snug and looking neat. Now, there are two main types of grout you might consider. If the spaces between your tiles are pretty wide, like bigger than a tiny crack, you’ll want to go with sanded grout. The sand in it helps fill those larger gaps more effectively. On the other hand, if your tile gaps are thin, almost like a hairline, then unsanded grout is the way to go. It’s smoother and works better for those tighter spaces. Choose the right one based on how your tiles are spaced, and you’ll be on your way to having a beautifully finished tiled area, whether it’s a backsplash, bathroom wall, or floor.
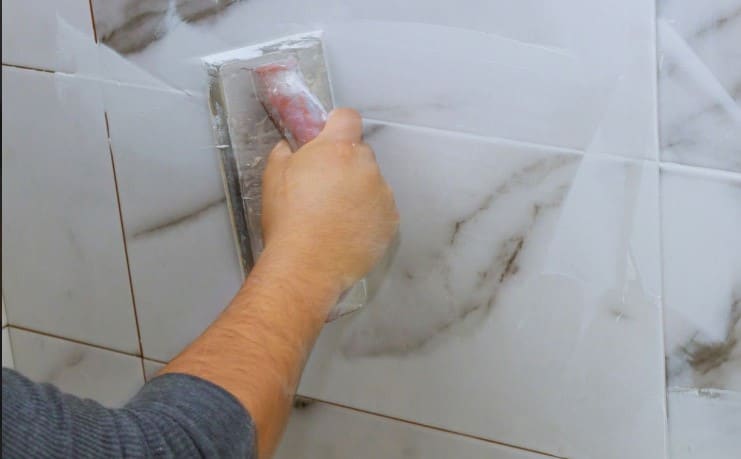
Mixing and Applying Grout Like a Pro
When you’re working with grout for your tiles, think of it like making a thick, creamy frosting for a cake, but instead of a cake, it’s for the spaces between your tiles. Start by reading the instructions that come with your grout mix because getting this right is key. You want the mix to be just like toothpaste in its thickness – not too runny, but not too hard either. Once you’ve got it to that perfect consistency, grab something called a grout float. This tool helps you press and smooth the grout right into those gaps between the tiles. Imagine you’re spreading peanut butter on bread, but you’re filling in lines instead. After you’ve filled all the gaps, there might be some extra grout on the tiles. No worries, just take a damp sponge, and gently wipe the excess off. Remember, the sponge shouldn’t be dripping wet, just a little damp. This step is like cleaning your hands after crafting; you’re making everything neat. This simple process will leave your tiled area looking great and fully sealed up!
Maintenance and Repair
A well-kept backsplash in your kitchen doesn’t just protect your walls from spills and splatters; it also adds a touch of beauty that can last for years. Believe it or not, you don’t need fancy, expensive cleaners to keep it looking as good as new. Simple soap and water do the trick just fine. Just like washing your hands, gentle soap mixed with some water can remove most of the dirt and grime that builds up over time. By giving your backsplash a quick wipe-down regularly, you can keep those tiles shining bright. This easy habit means you won’t have to scrub hard to clean it, and your kitchen will always sparkle. Plus, it’s a smart way to make sure your backsplash stays in top shape without spending extra money or effort. So, next time you’re tidying up, remember, that a little soap and water can go a long way in keeping your backsplash looking like it was just installed.
Repairing Chips and Cracks: Yes, You Can!
When we live in our homes, things get a bit worn out over time. Take your kitchen backsplash, for example. It might look a little less perfect than it did when you first put it up. Those pesky small chips and cracks can show up after a while. But here’s some good news: you do not have to tear down the whole backsplash and start from scratch when this happens. Yes, you heard it right. You can fix those little imperfections without going through all that trouble and expense. All it takes is a bit of know-how and some handy repair tips to make it look as good as new. So, before you start worrying about the cost and mess of a big project, remember that a small fix can go a long way in bringing back the beauty of your kitchen tiles.
Grout Maintenance: Preventing Mold and Staining
Keeping your grout sealed is like giving it a protective shield. Imagine spilling a glass of juice on the floor. If your grout is sealed, cleaning that spill can be as easy as wiping it up with a cloth, with no stains left behind. But if it’s not sealed, that juice might seep in, leaving a mark and possibly inviting moisture to hang out where it shouldn’t. Moisture in unsealed grout can lead to icky mold or even damage the integrity of your floors or walls over time. That’s why resealing your grout regularly is a must. It keeps it looking new, making your cleaning routine a breeze, and helps protect against unwanted moisture. Think of it as a quick and easy way to ensure your tiled areas stay in tip-top shape for years to come. Plus, it saves you from the hassle and expense of big repairs down the line. So, grab that sealant and give your grout the care it deserves!
Personalization and Upgrades
Incorporating Decorative Tiles for a Personal Touch
In the world of home decoration, something as simple as changing a few tile installations in your kitchen backsplash can make a big difference. Imagine having a plain white tile backsplash. It looks clean but maybe a little too ordinary. Now, picture adding just two or three tiles in a bright color or a fun pattern among those white tiles. Suddenly, your kitchen looks unique and lively. Those few differently colored or patterned tiles become the center of conversations when friends or family visit. They add a touch of personality and flair to your space without overwhelming it. It’s like adding a dash of your favorite spice to a recipe – a small change can bring a whole new flavor. So, if you’re thinking about refreshing your kitchen, remember that sometimes, all you need is just a tile or two of a different color or pattern to turn your backsplash into a talking point.
Lighting Considerations: Highlighting Your Backsplash
Lighting plays a big role in making your kitchen look and feel welcoming. Think about your backsplash. That’s the wall part right behind your counter or stove, often covered with tiles. By adding lights under your cabinets, you can make this area pop! It’s not just about making it easier to see when you’re cutting veggies or finding spices, though it does that too. This kind of lighting adds a cozy feeling to your kitchen and shows off the beauty of your backsplash tiles. Whether you’re grabbing a midnight snack or cooking a big meal, having the right lighting can turn your kitchen from just okay to wow. Plus, it’s a simple change that doesn’t cost a lot but makes a big difference. So, adding a little light can go a long way in making your kitchen a favorite spot in your home.
Conclusion
Embarking on the task of installing a tile backsplash installation by yourself is like setting off on an exciting expedition where creativity meets craftsmanship. It’s your chance to turn a simple wall into a striking display of your style. Before you start, make sure you’re armed with all the necessary tools and a clear plan. Think of preparing your workspace and gathering your materials as getting ready for an adventure. Installing a backsplash isn’t just about sticking tiles to a wall—it’s a creative journey. As you measure, cut, and place each tile, you’re not just changing the look of a room; you’re crafting a part of your home that’s uniquely yours. The real magic isn’t just in the stunning result but in the joy and satisfaction found in the process itself. So go ahead, dive into the experience, experiment with different designs, and don’t be afraid to make mistakes. After all, every step, every tile, is a learning opportunity that’s all part of the greater adventure.
Frequently Asked Questions
What’s the best way to cut tiles without chipping them?
Use a high-quality tile cutter and score the tile firmly and evenly before making your cut. Practice makes perfect!
How do I choose between sanded and unsanded grout?
The rule of thumb is to use unsanded grout for gaps smaller than 1/8 inch and sanded grout for larger gaps.
Can I install a tile backsplash over existing tiles or wallpaper?
It’s possible, but not recommended. For best results, remove the old materials and start with a clean, flat surface.
How long does it take for the adhesive and grout to dry?
Adhesive drying times vary, but 24 hours is a good general guideline. Grout typically takes a few days to cure fully.
Are peel-and-stick tiles a good alternative?
Peel-and-stick tiles can be a quick, easy option for a temporary fix, but they may not offer the durability or look of traditional tiled backsplashes.